Recently I completed a custom portrait in which were a myriad of very specific details requested, including a leopard-print unitard. I’ve also completed portraits including leopard print scarves, leopard print cardigans, and leopard print shoes.
So let’s talk about how to create a leopard-print pattern in a Stitch People portrait!
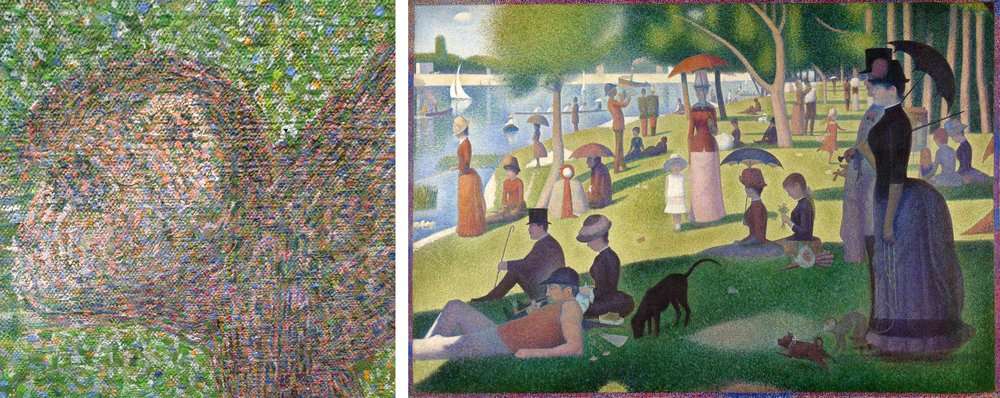
When you step back and look at a completed cross-stitch family portrait, it’s likely that you’ll take in the full effect of the portrait, rather than the minutia of each detail. It’s rather like a painting technique: pointillism. This technique is frequently recognized in paintings by George Seurat (like his famous painting A Sunday on Le Grande Jatte, shown below.) With pointillism, artists create large-scale paintings using very small brushstrokes of color. Note the painting as a whole, from afar, and then the detail in an up-close shot of a small section of the same painting. Quite a creative and lovely way to paint, don’t you think?
It is in a VERY similar way that I like to create a leopard print pattern in clothing items for Stitch People portraits (or for an actual leopard, if you have reason to include one in your portrait! Awesome!)
In the above image of Seurat’s painting, we can easily see that he chose to break down the colors of the little pet monkey’s fur (seen in the bottom, right corner of the painting) into many hues of browns, tans, greens, blues and pinks. In a Stitch People portrait, we’re limited with the number of colors we can include because of the thickness of the thread. Generally speaking, I use and recommend three threads of floss for the majority of Stitch People portrait stitches. So in our case, we’re limited to choosing three colors to represent our leopard print.
I think it’s safe to say that a leopard print is made up of a light tan, a darker tan / light brown, and a very dark brown / black color. So, I recommend using one thread of floss in each color to complete the leopard print look.
I use DMC floss, personally, (I’m not sponsored) so my color recommendations will be DMC colors, but there are many conversion charts out there.
- Light Tans: 422, 612, 3828
- Medium Tans: 840, 869, 3862
- Dark Brown / Black: 3371, 310
Using one thread of DMC 422, one thread of DMC 840, and one thread of DMC 3371, I created the leopard print unitard in the image above. I used this combination for all the stitches in the outfit to complete the look of leopard print.
From afar, the combination of the three colors of floss provides the effect of leopard print.
Another option would be to randomly place stitches of varying floss color combinations throughout the pattern of a clothing item, completing it in a way so as to allow more of the light color to show through. For example, approximately one-third of the stitches would be a combination of one thread 422 (light), one thread 840 (medium) and one thread 3371 (dark), then approximately one-third of the stitches would be a combination of two threads 422 (light), 1 thread 840 (medium), and the remaining (approximate) one-third of the stitches would be a combination of two threads 422 (light), 1 thread 3371 (dark). This way, more of the light color would show through, and the “spots” of medium and dark color would look a little more varied.
Keep this method of cross-stitch “pointillism” in mind when facing tricky patterns and prints in your Stitch People cross-stitch family portraits!
Have a lovely day,

[share title=””]
I did something similar to try and mimic the black jeans with little white dots my daughter was wearing in a photo. I used two black and one white thread. It allowed just enough white to be seen and look like the little dots.