Last time on the blog, we talked about how to create your own cross-stitch grid/chart out of a spreadsheet program. This time, we’re going to show you how to add a pattern to the chart you created! It’s a fairly simple process and works up quickly.
A couple of things to keep in mind:
It’s best to keep your pattern simple. You can add half-stitches, circles and lines (see below) but a lot of them will increase your workload. Try just sticking to full blocks (cross-stitches) for your pattern and fill in where you need to when you get to the stitching.
With that in mind, if you think you will want a more complex pattern with half-stitches, quarter-stitches, circles, chart symbols and color recommendations – this probably isn’t the pattern making process for you. Take a look at one of the dedicated cross-stitch pattern making apps such as Stitch Fiddle, Stitch Sketch and PC Stitch!
Choose common colors
First you’ll want to set up a color palette for yourself. This makes it easier when it comes to building a pattern because you don’t have to keep creating a new color every time.
The color palette you create should be filled with common colors that you’ll be using – so different skin tones, different hair tones, different colors for your clothes and shoes.
To create your palette, you can use the following process. We’ll start by choosing a few skin tone colors:
- Bring your cursor up to your menu and select the little arrow next to ‘Color Fill’ (the spilling paint bucket symbol)
- Head to the bottom of the menu that opens and choose ‘More Colors’
- This will open the color mixing menu at the bottom of which you’ll see a large square. This is what you will watch to see what your final color will be
- Click somewhere in the circle and drag your cursor until you see a color that matches the skin tone you need. Be gentle because slight movements can result in big color changes.
- You can also make the color you choose slightly darker or lighter. Just above your color matching square, you’ll see a sliding scale that goes from light to dark. Drag the scale until the color matching square shows the color that you like.
- When the square more or less matches the color you need, click ‘OK’.
- Repeat this process a couple more times choosing different skin tones, hair tones and a few clothing colors.
- When you’re finished, you’ll see all the colors you made under ‘Recent Colors’ of your ‘Color Fill’ menu!
Here is a video of the process of creating a color palette:
Define the Grid
Before you start adding your pattern, you’ll need to be able to differentiate between each color block/stitch. To do this, we need to define our grid sheet which basically means adding lines between all the squares. This is easy to do:
- First select the whole sheet
- Go up to the home menu and click the little arrow next to the ‘Borders’ button
- Scroll down and select ‘All borders’
- That’s it. All your grid lines should be defined.
Here is a video of how to define your grid lines:
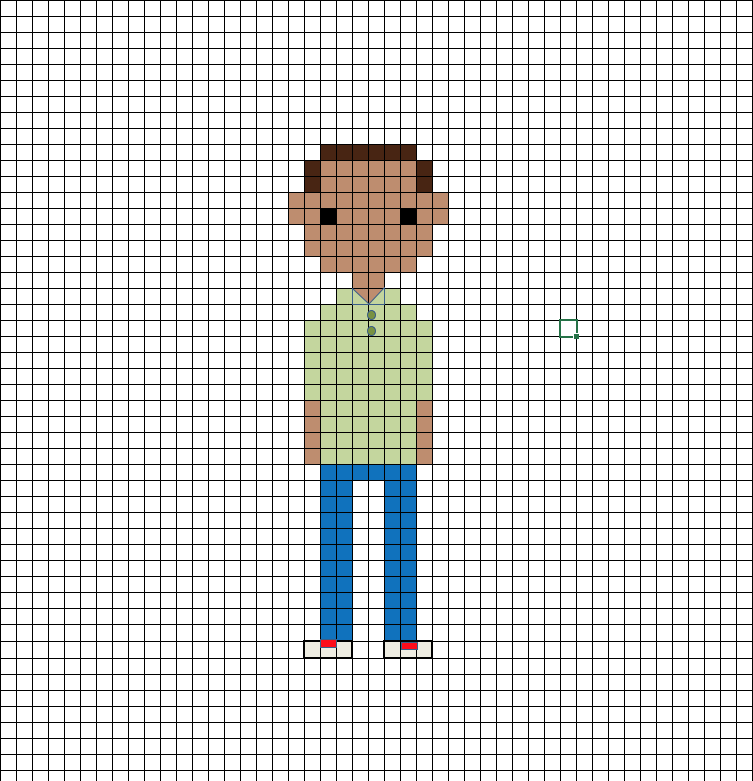
Start filling in the pattern
Now the fun part! Time to start filling in your pattern.
- First click in the area of your grid that you would like to begin your pattern (see creating a grid sheet in a spreadsheet program for how to find the middle of your grid). We’re starting from the head and working down.
- Go up to the home menu and select the little arrow next to the ‘Color Fill’ button
- Scroll down and select your first color from the color palette you made earlier. We like to start by filling in the skin areas.
- When you click on your first color, the box you selected will be filled in with that color.
- Right click on the filled box in your grid, scroll down and select ‘Copy’. This will copy the color in that box.
- Using the arrow keys on your keyboard, move over to the next square you want to fill.
- Either Ctrl + V (Win), Cmd + V (Mac) or right-click and paste. This will fill the next square along!
- Continue in this fashion until you have filled in all the squares you need of that color.
- When you’re ready to move on, select the square you want to fill with your next color and repeat the above steps.
Here is a video of the process:
Adding half-stitches and other shapes (Excel Only)
Adding other shapes such as triangles, circles and lines can be a bit fiddly. As we mentioned above, if possible, stick to the full squares/stitches and fill in the half-stitches and lines when it comes to stitching. Right now, you’re just concentrating on giving yourself a simple pattern.
If however you do want to add these parts to your pattern, you’ll need to create the shapes, and drag them into position yourself. Unfortunately this won’t work for Google Sheets since they do not have the shapes function yet but it will work for Excel. You can usually download a version of Excel for free from your app store. We’ll demonstrate with a couple of half-stitches:
- First select a square on your grid away from your pattern. We select it away from the pattern so you’re able to see the details of the shape you’re about to add.
- Go up to your menu and select ‘Insert’
- From the Insert menu, select the little arrow next to the ‘Shapes’ button.
- For a half-stitch, we need a half square triangle shape. You will probably only see one, that’s OK, one is all you need. Click on that shape.
- Move over to the square you selected on your grid sheet. Click and drag your cursor until the shape you have selected appropriately fills the square. Release your cursor. You’ll now see the shape, but it’s probably the wrong color.
- From the menu, go up to the little arrow next to the ‘Color Fill’ button. Scroll down to your ‘Recent Colors’ and select the appropriate color for your shape.
- You’ll see that our half-stitch shape is in the wrong position for where we want it. All we need to do to change that is to click and hold on the circle arrow that sits just above our shape. Drag and spin the shape so that it sits in the position you need, then release your cursor.
- Now all you need to do is click and drap your shape over to where you want your half-stitch to be!
- These same steps can be used to add circles for French Knots, lines for letters or smiles or rectangles for horizontal or vertical half-stitches!
Here is a video showing how to add a half square triangle to represent a half-stitch:
That’s it!
Once you’ve repeated the above steps for each of your characters, you should have a pretty nice pattern to work from! This can be printed out at home or just saved to view on your screen whenever you are stitching.
We hope you have fun building your Stitch People patterns in a spreadsheet program! As always, if you have any questions, comment below or email us at info@stitchpeople.com
Happy stitching!
Before you get started with ANYTHING, how do you get all of your cells to be square instead of rectangular?
The previous blog post – “how to create your own cross-stitch grid/chart out of a spreadsheet program” – describes (and has a video) of how to get your cells to be square (among other things). The author has a link to the blog post in the first sentence of this blog post.
this is why i got my grandgirls interested in stitching! they can do this….and i am lost! (and that is ok with me. they are great helpers!
If I have a picture in mind, can it be imported and turned into a chart through a spreadsheet program or do I have to manually “color” each square to make it myself??